The $20 Bokashi Bin Beats the $60 One. Here's the Evidence.
This article contains affiliate links. If you buy through them, we earn a small commission at no extra cost to you.
Here’s the thing nobody puts in the marketing copy: the most commonly cited complaint about commercial bokashi bins isn’t the price — it’s the spigot. The tap that comes factory-installed on virtually every branded kit clogs constantly. Users end up having to lift and tilt the bucket to drain the leachate anyway, which defeats the purpose of the tap entirely.
One r/ZeroWaste commenter put it plainly: “The buckets made for it suck — they get clogged a lot. I found a two-bucket system with drilled holes works better overall.”
And a YouTuber who ran a side-by-side trial — filling a DIY 5-gallon bucket setup simultaneously with a professionally made commercial bin — found “no meaningful difference in outcome.” Just a $40+ price difference.
So the myth is this: you need to buy a bokashi kit to do bokashi. You don’t. Two hardware-store buckets and 30 minutes is all it takes. But let’s cover the full picture, because the bin isn’t even the most important decision you’ll make.
First: What Bokashi Actually Is (And Isn’t)
Bokashi isn’t composting. It’s fermentation — a pretreatment step that pickles your food waste in an anaerobic environment so it breaks down fast when buried. You still need a second stage: burying the output in soil, or running a “soil factory” in a tote. If you skip this step, you just have a bucket of acidic fermented bio-pulp with nowhere to go.
This distinction matters because a lot of first-timers buy a bokashi kit, love it for six weeks, then get stuck when the bin fills up and they don’t have a yard or a plan. Solve the second stage before you buy anything.
What makes bokashi worth doing at all:
- It accepts meat, dairy, cooked foods, and citrus — things that don’t belong in a worm bin or hot pile
- It works indoors, in any climate, year-round
- A properly sealed bin produces zero smell
- It can turn a cold, slow outdoor compost pile into a heating, fast one
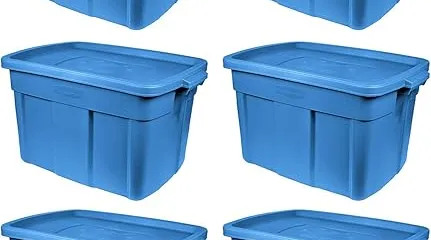
The Actual Best Setup: DIY Two-Bucket System

Price: $10–$25 total Buy on Amazon
Two 5-gallon buckets from any hardware store, one nested inside the other. Drill a grid of small holes in the bottom of the inner bucket — these let leachate drain into the outer bucket. Add your own spigot to the outer bucket (a standard 3/4-inch irrigation spigot fits a 3/4-inch drill hole and seats snugly). Gamma lids, praised across multiple threads, create the airtight seal that bokashi requires without the fight of prying off a standard bucket lid.
Setup time: about 30 minutes. Cost advantage over commercial kits: $30–$60.
The one quirk to know: when the inner bucket gets heavy with waste, the nested pair can form a vacuum seal that’s nearly impossible to separate. The fix is simple — drop a brick or a small piece of wood between the buckets to break the seal. Multiple users independently discovered this and recommend it.
This is what most experienced bokashi users run. From r/composting: “We have two bokashi setups that I made from orange 5 gallon buckets that I added a valve to. We fill one up, let it sit while the other one gets filled up, then add it to our outdoor compost pile.”
Best for: Anyone willing to spend 30 minutes on setup. Ideal for apartment composters who want the same performance as commercial kits at a fraction of the cost.
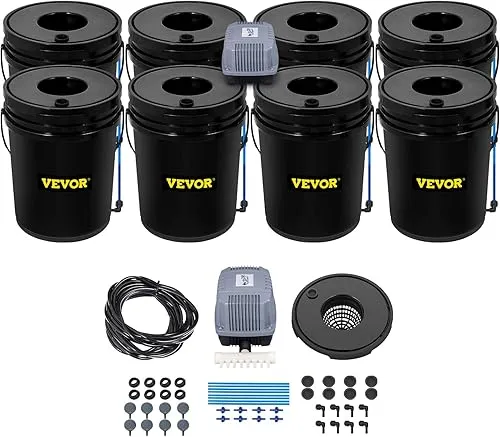
Commercial Bokashi Kits: When They Make Sense

Price: $40–$80 Buy on Amazon
The commercial two-bin kit does have genuine advantages: it ships with a spatula/tamper, a leachate collection cup, starter bran, and a purpose-built lid. If you’re giving bokashi as a gift, or you genuinely don’t want to pick up a drill, this is the turnkey path.
The trade-offs are real, though. The built-in spigot is the weakest point in the design — it clogs, and multiple users across different brands report the same issue. One user who ran a parallel DIY vs. commercial test called the outcome identical, just more expensive.
There’s also the bran cost framing. One r/composting commenter described the ongoing bran requirement as “a bullshit scam” — though others push back on this, noting a bag lasts months for a small household. The more accurate framing: factor in ~$10–20/year for bran when comparing total cost. If you want to eliminate this entirely, experienced users make their own inoculant from EM-1, rice water, molasses, or overly-sour kombucha.
Best for: People who want everything in one box and don’t want to touch a drill. Also a solid gift for someone who expressed interest but won’t set one up themselves.
The Part Everyone Skips: The Soil Factory

Price: $15–$30 Buy on Amazon
When your fermentation bin is full and has rested two weeks, you have a bucket of pickled food waste. It needs to go somewhere aerobic — a garden bed, a buried trench, or a soil factory — before it becomes actual compost.
A soil factory is just a large lidded tote (Rubbermaid, a spare storage bin, anything with a lid) filled with a 3:1 mix of soil and bokashi output. Cover the top layer with a few inches of plain soil so you can’t smell it. Wait four weeks. Done.
From r/bokashi: “I think a compost bin would work, but a Rubbermaid tub worked for me. You can get by without buying ‘special’ equipment.”
The soil factory is where apartment composters often get stuck. You need floor space — a balcony works, a closet doesn’t. If your living situation genuinely can’t accommodate a second tote of dirt, bokashi may not be the right fit. That’s worth knowing before you buy the bin.
How to Not Fail at Bokashi
These come directly from r/composting and r/bokashi threads — the same mistakes show up again and again:
Compress after every addition. The process is anaerobic. Air pockets cause rotting instead of fermentation. Use a potato masher, the included spatula, or your fist through a plastic bag.
Close the lid completely. Every time. A loose lid is the most common cause of a failed batch. The bin should be odorless when properly sealed.
Drain leachate every 2–3 days, even when the bin is “resting.” The tea keeps accumulating. Dilute heavily before using on plants — 1:50 to 1:100 — and avoid container gardens where salt accumulates.
Don’t skimp on bran at the start. You’re racing good bacteria against bad bacteria. Give the bokashi microbes a head start with a generous initial layer.
White mold is fine. It looks alarming and means fermentation is working. Gray or green mold means too much air got in.
Wait at least two weeks after the bin fills before processing. Rushing this step produces output that hasn’t fully fermented.
Don’t add moldy scraps, oils, or hard bones. Mold introduces competing bacteria. Oils disrupt microbial balance. Hard bones simply won’t break down.
The Actual Decision
Before you buy anything, answer these two questions:
Do you have somewhere for the output to go? A backyard, a garden bed, or floor space for a soil factory tote. If no, stop here and solve this first.
Are you willing to drill two holes and add a spigot? If yes: buy two 5-gallon buckets with Gamma lids and skip the commercial kit entirely. If no: the commercial two-bin kit gets you started without any setup.
The bin itself is the least important part of the equation. What matters is the bran, the seal, the compression, and what you do with the output. Get those four things right and it works — in buckets from Home Depot just as well as in a $70 kit.
Bokashi is one of the few composting methods that handles meat and dairy without outdoor space or worms. If that’s what drew you here, the DIY bucket system is the right call. The $40 you save goes a long way toward bran — or toward making your own.